IT코딩공부!
#7 day6복습, 필드,생성자,메소드(main)공부
history.
2023. 3. 29. 17:34
혼자 공부하는 자바
혼자 해도 충분하다! 1:1 과외하듯 배우는 자바 프로그래밍 자습서 (JAVA 8 &11 지원) 이 책은 독학으로 자바를 배우는 입문자가 ‘꼭 필요한 내용을 제대로’ 학습할 수 있도록 구성했다. ‘무엇을’ ‘어떻게’ 학습해야 할지 조차 모르는 입문자의 막연한 마음을 살펴, 과외 선생님이 알려주듯 친절하게, 그러나 핵심적인 내용만 콕콕 집어준다. 책의 첫 페이지를 펼쳐서 마지막 페이지를 덮을 때까지, 혼자서도 충분히 자바를 배울 수 있다는 자신감과 확신이 계속될 것이다! 20명의 베타리더 검증으로, ‘함께 만든’ 입문자 맞춤형 도서 20명의 베타리더와 함께 구성하여 입문자에게 맞는 난이도, 분량, 학습 요소 등을 적극 반영했다. 어려운 용어와 개념은 한번 더 풀어 쓰고, 복잡한 설명은 눈에 잘 들어오는 그림으로 풀어 냈다. ‘혼자 공부해본’ 여러 입문자의 초심과 눈높이가 책 곳곳에 반영된 것이 이 책의 가장 큰 장점이다.
- 저자
- 신용권
- 출판
- 한빛미디어
- 출판일
- 2019.06.10
[0] day6복습

/**
* 	Date : 2023.03.29
	Author : funling
	Description : day6복습
*/
package Java0329;

public class _00_review {

	public static void main(String[] args) {
		// 배열 : 같은 타입의 데이터를 하나의 변수에 저장하는 구조


		// 차이점!!
		// 1차원 배열
		// 타입[] 배열이름 = new 타입[j];


		// 2차원 배열
		// 타입[][] 배열이름 = new 타입[i][j]
		// i행 j열!! 기억

		// 2차원배열 반복문

		// i(행)에 배열의 크기
		// array.length

		// j(열)에 배열의 크기
		// array[i].length

		String[] stu = {
				"김상훈", "김정태", "김하나", "마윤호",
				"벡기호", "박현상", "성민규", "유혜순",
				"윤현수", "이성종", "이예진", "임가희",
				"조형섭", "한혜휘", "황인철", "박준수"
		};

		String[][] group = new String[4][4];

		for(int i=0; i<group.length; i++) {

			for(int j =0; j<group[i].length; ) {
				int n = (int)(Math.random() * 16);

				if(stu[n] != null) {
					group[i][j] = stu[n];
					stu[n] = null;
					j++;
			}
		  }
		}

		for(int i=0; i<group.length; i++) {
			System.out.println("===" + i + "조===");

			for(int j =0; j<group[i].length; j++ ) {
				System.out.println(group[i][j]);
			}
			System.out.println();
		}
	}
}
// 팀 과제를 을 위해 랜덤 함수를 사용하고 거기의 2차원배열을 사용해서 팀 구성을 해보았다.
[1] 필드, 생성자, 메소드 (기본 구조) 알기!
(1) 필드
클래스의 3가지 요소
//	 [1] 필드
//	  - 명사형, 값의 상태 관리, 데이터를 저장...
	 String company; 	//제조회사
	 String color;		//제품색상
	 int price;			//제품가격
	 int size;			//제품크기
	 int temp;			//현재온도
//필드의 명시되어 있는것 처럼 각 타입의 변수를 지정해 준다!
(2) 생성자
[2] 생성자
	 /*

	  생성자의 기본구조
	  _01_airCon(매개변수){

	  }


	  (1) 기본생성자
	   : 괄호안(매개변수)에 아무것도 없는 생성자
	   : java 컴파일러가 기본적으로 생성자가 없을 경우 자동으로 만들어준다.
	   : 단 매개변수 생성자를 생성했을 경우 따로 만들어줘야 사용할 수 있다.
	  */
	  _01_airCon(){

	  }

//	  (2) 매개변수 생성자 : 괄호안(매개변수)에 필드를 선언한다.
	  _01_airCon(String company){
		  this.company = company;
	  }

	  _01_airCon(String company, String color){
		  this.company = company;
		  this.color = color;
	  }

	  _01_airCon(String company, int size){
		  this.company = company;
		  this.size=size;
	  }

	  _01_airCon(int price, String company){
		  this.company = company;
		  this.price = price;
	  }

	  //데이터타입에 따라 중복이 허용되지 않는다
//	  _01_airCon(String company, int price){
//		  this.company = company;
//		  this.price = price;
//	  }

	  _01_airCon(String company, String color, int price, int size, int temp){

		  this.company = company;
		  this.color = color;
		  this.price = price;
		  this.size = size;
		  this.temp = temp;
	  }
// 기본적인 생성자를 기억하자!
// 기본생성자를 알면 매개변수 생성자에 입혀 this.(변수) = (변수); 지정 필수
// 매개변수 순서 꼭 알기!!!
(3) 메소드
[3] 메소드
	  /*

	   데이터타입 메소드이름(매개변수){
	   		실행내용;
	   		(데이터타입)리턴값;
	   }

	   */

//	  boolean state = false; //에어컨 전원상태 여부를 나타내는 변수(on/off)
//
//	  boolean onPower() {
//		  // Add return statement : 리턴문장 추가
//		  // Change return type to 'void' : 리턴타입을 void로 바꿔라
//
//		  state = true;
//		  return state;
//
//	  }
//	  boolean run = onPower();

	  // Q. run의 값은?? true가 된다

	  void onPower() {
		  System.out.println("에어컨 전원 On!");
	  }

	  // 메소드 이름도 중복X
	  void offPower() {
		  System.out.println("에어컨 전원 Off!");
	  }

	  //온도 1 증가
	  void upTemp() {
		  temp++;
	  }

	  //온도 1 감소
	  void downTemp() {
		  temp--;
	  }

	  //현재 온도
	  int curTemp() {
		  return temp;
	  }
}
// void 메소드명() {
// System.out.println("아무거나" + 변수);
// }
[1] main 알기!
package Java0329;
import java.util.Scanner;
public class _01_airConMain {
public static void main(String[] args) {
// Scanner객체 생성
Scanner sc = new Scanner(System.in);
//클래스 Scanner 생성자Scanner
// 객체생성를 통해서 필드와 생성, 메소드 사용
// _01_airCon 객체 생성 : 기본생성자
_01_airCon aircon = new _01_airCon();
// _01_airCon 객체 생성 : 매개변수 생성자
_01_airCon aircon1 = new _01_airCon("삼성", 20);
// 객체의 멤버 변수(필드)에 접근하는 방법 : 도트(.)연산자 사용
aircon.color = "white";
aircon.price = 160;
aircon.temp = 21;
System.out.println("색상 : "+ aircon.color);
System.out.println("가격 : "+ aircon.price);
System.out.println("온도 : "+ aircon.temp);
System.out.println("회사 : "+ aircon1.company);
System.out.println("크기 : "+ aircon1.size);
aircon.color = "white";
aircon.price = 160;
aircon.temp = 21;
System.out.println();
//////////////////////////////////////////////////
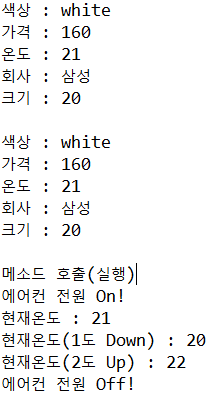
aircon1.color = "white";
aircon1.price = 160;
aircon1.temp = 21;
System.out.println("색상 : "+ aircon1.color);
System.out.println("가격 : "+ aircon1.price);
System.out.println("온도 : "+ aircon1.temp);
System.out.println("회사 : "+ aircon1.company);
System.out.println("크기 : "+ aircon1.size);
System.out.println();
System.out.println("메소드 호출(실행)");
// 메소드 호출(실행)
aircon.onPower();
System.out.println("현재온도 : " +aircon.curTemp());
aircon.downTemp();
System.out.println("현재온도(1도 Down) : " +aircon.curTemp());
aircon.upTemp();
aircon.upTemp();
System.out.println("현재온도(2도 Up) : " +aircon.curTemp());
aircon.offPower();
}
}// main이라는 class를 새로 만들어서 앞전에 만들던 class를 불러와서 최종 출력을 도와준다는 개념
// 입력을 먼저 불러올 Scanner객체를 생성
// 객체생성을 통해 기본생성자를 만들고 거기에 매개변수 생성자를 만들어서 사용한다.
// 객체 멤버에 적용시키려면 도트(.) 연산자 사용해서 꼭 불러오기!
//출력
[1] main 알기! 2
package Java0329;

import java.util.Scanner;

public class _01_airConMain2 {

	public static void main(String[] args) {
		// 에어컨 2대 생성
		// (1) 기본생성자 설계
		// (2) 모든 매개변수 생성자 설계

		_01_airCon aircon = new _01_airCon();

		_01_airCon aircon2 = new _01_airCon("LG", 34);

		aircon.color = "검정색";
		aircon.price = 300;
		aircon.temp = 24;

		System.out.println("색상 : "+ aircon.color);
		System.out.println("가격 : "+ aircon.price);
		System.out.println("온도 : "+ aircon.temp);

		System.out.println("회사 : "+ aircon2.company);
		System.out.println("크기 : "+ aircon2.size);
		System.out.println(aircon2.company+"사의 "+ aircon.color+"의 "+aircon.price+"만원짜리 "+ aircon2.size+"평형 에어컨의 온도를 " + aircon.temp+"도로 설계");


		System.out.println();
		System.out.println("리모콘");
		aircon.onPower();

		System.out.println("현재온도 : " +aircon.curTemp());

		aircon2.downTemp();
		System.out.println("현재온도(1도 Down) : " +aircon2.curTemp());

		aircon2.upTemp();
		aircon2.upTemp();
		System.out.println("현재온도(2도 Up) : " +aircon2.curTemp());

		aircon.offPower();

	}
}
//출력


[2] carClass
매개변수 작성법 중요!!!

(1) 필드
public class _02_car {

	// 클래스 3요소

	//[1] 필드
	// 색상(color), 최고속도(speed), 연료타입(type), 모델명(model)
	// 회사(company)는 "현대"로 지정
	String color;
	String commpany = "현대";
	int speed;
	String type;
	String model;
(2) 생성자
//[2] 생성자
	//(1) 기본생성자
	public _02_car(){

	}


	//(2) 모든 매개변수를 가지는 생성자
	_02_car(String color, String commpany, int speed, String type, String model){
		this.color 		= color;
		this.commpany 	= commpany;
		this.speed 		= speed;
		this.type 		= type;
		this.model 		= model;

		// this를 사용하면 필드, 사용하지 않으면 매개변수값
	}
(3) 메소드
//[3] 메소드
	// 자동차 정보를 출력하는 메소드
	void carInfo() {
		System.out.println("색상 : " + color);
		System.out.println("속도 : " + speed);
		System.out.println("타입 : " + type);
		System.out.println("모델명 : " + model);
		System.out.println("제조사 : " + commpany);
	}

	// 필드 추가
	int gas;

	// 메소드 추가 : gas 충전
	void setGas(int gas) {
		this.gas = gas;
	}

	// 주행 메소드
	void drive() {
		boolean run = isLeftGas();

		while(run) {
			if(gas >0) {
				System.out.println("주행합니다.  (gas잔량 : " + gas + ")");
				gas--;
			}else {
				System.out.println("멈춥니다. ("+ gas + ")");
				run=false;
			}

		}

	}

	// 연료확인 메소드
	boolean isLeftGas() {
		if(gas!=0) {
			System.out.println("gas "+ gas + "만큼 남아있습니다." );
			return true;
		}else {
			System.out.println("gas가 없습니다" );
			return false;
		}

	}

}
[2] main 알기!
public class _02_carMain {
public static void main(String[] args) {
// myCar객체를 기본생성자 만들고
// 내가 원하는 자동차 정보를 입력!
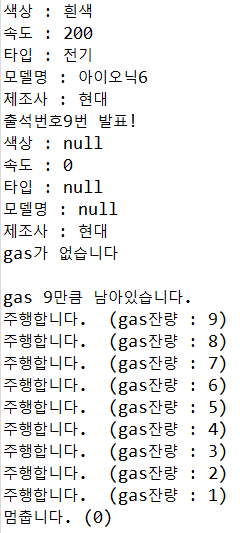
_02_car myCar = new _02_car();
myCar.color = "흰색";
myCar.model = "아이오닉6";
myCar.speed = 200;
myCar.type = "전기";
myCar.carInfo();
// 조원 차량을 매개변수 생성자로 만들고
// carInfo()메소드를 사용해 출력!
_02_car hsCar = new _02_car();
// 발표자
int n = (int) (Math.random() * 14) + 1;
System.out.println("출석번호" + n + "번 발표!");
hsCar.carInfo();
hsCar.drive();
System.out.println();
hsCar.setGas(n);
hsCar.drive();
}
}//출력
[3] StudentClass
(1) 필드
// 필드
	String name;
	int age;
	String address;
	String contact;
(2) 생성자
// 기본생성자!!
	Student() {

	}

	// 매개변수 생성자
	Student(String name, int age, String address, String contact) {
		this.name = name;
		this.age = age;
		this.address = address;
		this.contact = contact;
	}
(3) 메소드
// 메소드
	void StuInfo() {
		System.out.println("이름 : " + name);
		System.out.println("나이 : " + age);
		System.out.println("주소 : " + address);
		System.out.println("연락처 : " + contact);
	}

}
[3] main 알기!
// 입력받기 위한 빈 배열로 만들고
// 입력 받기 위한 변수를 지정!
// 입력받은 변수에 각 메소드 지정!
// 변경할 조원만큼 메소드을 불러와 변경될 변수를 추가 지정해 줘서 조건문으로 선택한다.
import java.util.Scanner;
public class StudentMain {
public static void main(String[] args) {
// 입력받기 위한 Scanner
Scanner sc = new Scanner(System.in);
// Student란 변수에 빈 배열로 함
Student[] student = null;
// 학생 값을 받을 변수
int stuNum = 0;
boolean run = true;
int menu;
while (run) {
System.out.println("=================================================");
System.out.println("1.학생수 | 2.정보입력 | 3.정보출력 | 4.정보수정 | 5.종료");
System.out.println("=================================================");
System.out.print("선택 : ");
menu = sc.nextInt();
switch (menu) {
case 1: // 입력받을 학생수
System.out.println("학생 수 : ");
stuNum = sc.nextInt();
break;
case 2: // 학생수 받은만큼 이름, 나이, 주소, 연락처출력
student = new Student[stuNum];
for (int i = 0; i < student.length; i++) {
Student stu = new Student();
System.out.println((i + 1) + "번 학생 정보 입력");
System.out.println("이름 입력 : ");
stu.name = sc.next();
System.out.println("나이 입력 : ");
stu.age = sc.nextInt();
sc.nextLine().trim();
System.out.println("주소 입력 : ");
stu.address = sc.nextLine();
System.out.println("연락처 입력 : ");
stu.contact = sc.next();
System.out.println();
student[i] = stu;
}
break;
case 3: // 조원의 stuInfo를 불러와 보여준다
for (int i = 0; i < student.length; i++) {
System.out.println((i + 1) + "번 조원입력");
student[i].StuInfo();
System.out.println();
}
break;
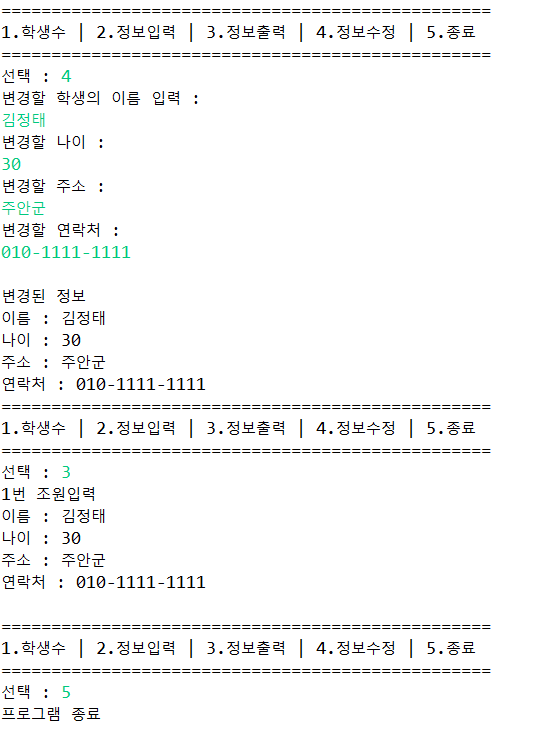
case 4: // 변경될 수 만큼 변경 선언해주기
System.out.println("변경할 학생의 이름 입력 : ");
String cName = sc.next();
int check = 0;
for (int i = 0; i < student.length; i++) {
if (cName.equals(student[i].name)) {
System.out.println("변경할 나이 : ");
student[i].age = sc.nextInt();
sc.nextLine().trim();
System.out.println("변경할 주소 : ");
student[i].address = sc.nextLine();
System.out.println("변경할 연락처 : ");
student[i].contact = sc.next();
System.out.println();
System.out.println("변경된 정보");
student[i].StuInfo();
check++;
}
if(check == 0) {
System.out.println("없습니다");
}
}
break;
case 5: // 종료
run = false;
System.out.println("프로그램 종료");
break;
default:
System.out.println("다시 입력하세요");
break;
}
}
}
}//출력